 Gilman Studio On-Line Lessons
Yang Style
Tai Chi Dao/Saber/Broadsword
This Lesson Contains:
Introduction to Tai Chi Saber
Welcome to the On-line Saber class. We are starting a wonderful journey toward the goal of learning a beautiful, challenging, and fun form. It is not a difficult form to learn for most people who have had any experience in sports like tennis, golf, baseball, and other activities that require holding an object. And even if you haven’t, I know that it shouldn’t be too hard to learn if you practice.
There are various names for the single edge weapon. I was taught by Master Choy to call it a saber. I believe the general name for this type of weapon in Chinese is Dao. It is also called the broadsword. If you look at the weapon I am using in these pictures, you will see that it is rather broad toward the cutting end. I would call this a broadsword. The saber tends to be more of a regular width along its length. Most of the wooden practice weapons tend to be a broadsword. It doesn’t matter what you use to learn and practice. Just make sure that it has a single edge. Look on-line to order a wooden Dao. For my studio, I order from Asian World of Martial Arts at www.awma.com.
The Saber Form has many of the same movements as the Yang Style Long Form. Traditionally, this form is taught after the Long Form has been mastered, and before the double edge sword is taught. The saber is a heavier weapon to wield then the sword and the movements are not as complex and intricate. The saber is likened to the tiger, whereas the sword is compared to the dragon. For a good look at the difference between the sword and saber look on line at sights such as www.northernwu.com. There is an excellent article by David F. Dolbear , An Introduction to Antique Chinese Swords of the Qing Dynasty Period. Dr. Yang Jwing Ming also has a good book on Chinese weapons, available at YMAA or Amazon. In any case, there is some information about the history of Chinese weapons on the web and in books. This is not my field of expertise. I will be presenting the form and discussing the principles as they are needed to understand what the form is doing and why. The history I will leave to others.
The saber is mostly a slashing weapon as compared to the sword, which is mostly a poking tool. The saber is heavier with usually only one surface sharpened. The double edge sword of course has two sides sharp. I am a large, strong person, so the saber suits me well. Smaller people find the double edge sword more to their liking. The saber movements tend to be broad and swinging to gather momentum for the heaviness of the weapon. In war, the saber was in the front to deal with the front line of the opponent. The saber was used to cut down the horse solders and to cut through the rather heavy protection of the opponent’s front line troops.
My good friend Andy Dale, who is a master teacher, (www.wuji.com.) compiled a simple list of the 13 Energies of the Dao. They are: 1 – Pi or Splitting, 2 – Kan or Chopping, 3 – Beng or Snapping, 4 – Lan or Block, 5 – Chan or Spiral, 6 – Dao or Vibrate/shake, 7 – Jien or Cut/scissors, 8 – Yun or Cloud like, 9 – Jiea or Block intercept, 10 – Liao or Stir up, 11 – Mo or Smear, 12 – Cha or Stab, and 13 – Tiao or Flick.
I learned this form from my main instructor, Master Choy Kam-man. As far as I can see, it is a traditional Yang Style training form. My interpretation is slightly different then the Yang Family Saber form as shown in books, but the essence is there. I love this form and have been practicing and teaching it for over 30 years. I will be teaching this on-line course in the same way that I taught the Long Form – showing the form and applications together so you can understand exactly what you are doing. The Saber Form has 39 movements compared to the 108 of the Long Form, so the class will be quite a bit shorter then the Long Form class.
I would suggest you find a training partner and learn this together. It will help to keep you on track and work out problems with understanding. If you can’t, so be it. This form is very practical. The simple way is always the best way.
This form uses the same stances as the Long Solo Form. Please review the on-line Lesson #2 of my Long Form class to make sure you are doing all the stances correctly. Stances are very important in Tai Chi. They are our root and connection to the earth. Energy comes from the earth, into our legs, is transmitted by the waist and is expressed in our arms. I will be using the terms for the stances that I used in the solo form class: Wu Chi, horse, bow and sit, ding bow on heel or toe. Be sure you are familiar with these terms and my meaning.
Keep in mind that all the same basic principles of Tai Chi Chuan apply to the saber. If you are not familiar with these, do a little research by reading basic Tai Chi books like The Tao Of Tai Chi Chuan by Master Jou. This and others can be found on my Books and Links page.
As I said, I will not include a historical introduction. All the principles will be introduced as they come up in the form. I like to get right into the movements and let things evolve. As I said before, feel free to e-mail me with questions and comments. I love to hear from people who are using this site. I know you will enjoy this class as much as I enjoy the form. Once learned, the saber form tends to be quite a bit more aerobic in nature. It also contributes to improved hand and arm strength.
I will be having a companion videotape for your reference. It will be offered before this course is over. Look on the Home page for this and other items I am selling. So let’s get right into the lessons.
 Holding The Saber – At rest
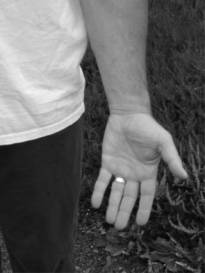
1) Face the open left hand with the palm facing forward.
2) Place the saber handle in the open hand and close the fingers lightly around it.
Note: Be sure to have the edge that would be sharp facing away from the body. The guard is near the wrist.
This is the way the saber is held when not in use.
 Holding the Saber – During the form
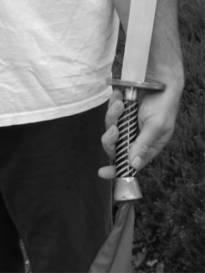
Notice how the hand wraps around the handle. It is very close to the guard. The guard is there to protect your fingers. The hand and wrist are favorite targets for any weapon since it is usually the closet thing to the opponent. Most guards on sabers have a recessed cup like holder on the outside or top. This is to catch any blood that might run down the weapon and spoil your grip. The grip is all you have between you and the weapon. Lose the grip and you have nothing.
Speaking of grip, don’t hold too tightly or loosely. The grip is likened to that of holding a bird. You don’t want it to fly away, but you don’t want to squeeze it to death.
Also notice the silk hanging from the pommel at the end of the handle. This had a couple of purposes. One was to wipe one’s hands if they got sweaty or blood covered. Another was as an object to confuse the opponent when waved in a certain fashion. I will be demonstrating that technique soon. Many people don’t keep the silk hanging there and find it distracting. When learning this form, I would recommend removing it. I think it is mostly a Wu Shu or demonstration device in any case.
The handle is made of wood, and usually covered with some thing to aid in the grip, like cotton or stingray skin. I have chosen to carve grooves in mine to make it easier to hold.
The length of the saber could vary greatly. Short ones were used for close in work, while longer sizes were good for staying further away and still being able to attack. The greater length usually meant heavier, so that was and is a consideration. Find a weapon that is comfortable to use. You can put effort later on in finding a special saber to suit your size and temperament.
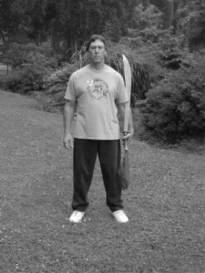
 The Greeting
This is a good way to start your practice. It is a focus tool and puts your mind on the right track. It is also the way one salutes another person when you are holding a weapon. When giving demonstrations, use this greeting to the audience before starting.
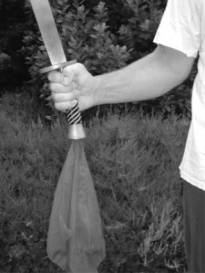
1) Start by standing in Wu Chi Stance. Hold the saber in your left hand with the sharp edge of the blade facing away from you. Notice the grip. It may seem awkward at first, but you’ll get used to it. The guard is slightly above the wrist. Some people hold the guard in their fingers, but I do not. I want my hand to be guarded at all times.
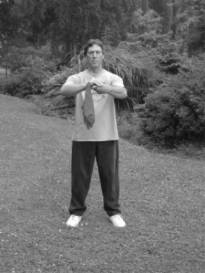
2) Raise the saber up to the center of the chest level. The left palm is facing more or less upward. The right palm is placed on the left hand, which is enclosing the handle.
3) Bring the saber back down to starting position.