 Gilman Studio On-Line Lessons
Yang Style Tai Chi Special 34 Movement Short Form
This Lesson Contains:
Stances: Wu Chi, Horse Riding, Bow and Sit, Ding Bow on Heel and Toe
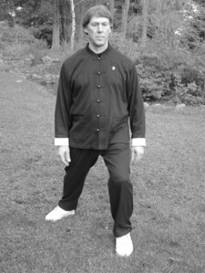
Learning to stand correctly — the Wu Chi Stance
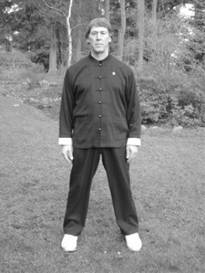 As I stated above, Wu Chi means stillness. In this stance, we seek to stand on our feet and maintain a position so balanced that the body is able to achieve stillness. When the body is still, the mind can more fully relax. When the mind is relaxed, the body can move in a natural way, and deal with situations as they arise.
In learning Tai Chi, we must examine all body positions and movements so as to eliminate anything that is not in our best interest. Even things as simple as just standing must be closely looked at. Do not assume you are doing things correctly just because you have been doing them one-way your whole life. We must start at the beginning and make sure we are in accord with the classics. We must pay special attention to the beginnings, because all that is to follow is built upon this foundation.
Begin by placing your feet shoulder width apart. The insides of your feet are parallel. You want to feel the weight of the body on bottom of the foot. Make sure the three main points of balance for the foot are touching the floor— the base of the big toe, the base of the little toe, and the heel
If possible, make sure the toes gently touch the floor and also the outside arch of the foot.
Next, move your attention to the ankle and visualize it as open and relaxed. Move your attention to your knees. First make sure that your knees are unlocked and soft. Test this out by locking your knees back and then release them. When your lock your knees you will find that you no longer feel the weight of the body on the bottoms of the feet. The weight of the upper body is now placed on the knee joint itself resulting in loss of flexibility and mobility. In Tai Chi, we always keep the knees soft and never locked.
Make sure that the knees point in the direction that the toes are facing, which should, at this time, be straight ahead. An essential general rule is to always have the knees face in the direction the toe is headed. Not paying close attention to this detail may result in injury to the knee. Many people have weakness in the knee area and the knee tends to track slightly toward the inside. Doing the exercises I will describe with full attention can strengthen this muscle weakness. This is very important, as the improper tracking of the knee is the only way people hurt themselves in the practice of Tai Chi.
After softening the knees, once again put your attention on the bottom of the feet and make sure the weight is evenly distributed over both the feet. Then bring your awareness up to your pelvis, low back area and let that area relax. We slightly tuck under or slightly rotate the pelvis so that the low back straightens a bit. We want the spine to be as straight as possible without stiffness. For most people, there is a distinct curve in the low back due to weakness in the abdomen and psoas muscles. This curve hinders the ability to allow the weight of the body to fully rest on the bottoms of the feet. As you gently tuck under the spine, check that the weight is on the bottoms of the feet. If you arch the back, you will notice that the weight leaves the bottom of the feet and moves to the knees and low back, resulting in loss of mobility once again. In Tai Chi we always are conscious to keep the low back relaxed and slightly tucked under. This will be natural and easy once the abdomen and psoas muscles tone from practice.
We now place our awareness on the top of the head and visualize the head as if it were suspended from above. We want the spine to be fully extended without tension, so we let our mind aid us by imagining being hung from the top. Keep the chin slightly tucked under. We do this for a couple of reasons. We protect the neck from being attacked when working with a partner and tucking also straightens the neck so the energy can run more easily up to the head.
The next step is to allow the shoulders and upper ribs to hang freely. The arms should hang on the sides of the body with the fingers facing the thighs. If you hands end up slightly in front of the body, it usually means that your biceps (the flexors on the front of your upper arm) are too strong in relation to your triceps on the back of your arms. You might have to use a bit of muscle strength in order to bring the arms into alignment, but after a while, the triceps should tone and that will allow the arm to hang naturally down by your side.
The last step in Wu Chi stance is to breathe naturally through the nose and direct the breath to the lower belly. We use belly breathing or diaphragmatic breathing as a general rule in Tai Chi. There is a more difficult, advanced form of breathing, reverse breathing, that will be discussed when the time comes. There are three main energy storage vessels located throughout the body. The main one for our physical energy, the lower Dan Tien, is located in the lower abdominal area, just below the belly button. When we breathe, we focus on this point, and the energy will naturally flow to this area. There are many exercises (Chi Kung) to help the student get in touch with how to work with the Dan Tien. I’ll give you some of my favorites as the time goes on.
- · Wu Chi Stance Checklist
Feet shoulder width apart and parallel. Knees soft and point to the toes. Pelvis slightly tucked under. Top of the head suspended from above with chin slightly tucked under. Shoulders and upper ribs hanging from above with arms hanging to the sides with fingers facing thighs. Breathing in and out through the nose directing the breath to the lower Dan Tien. Relax and be comfortable.
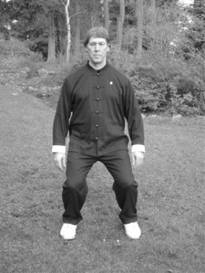
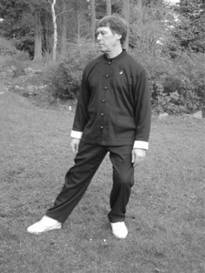
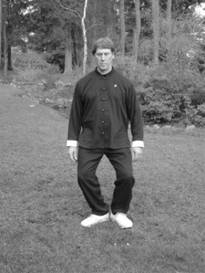
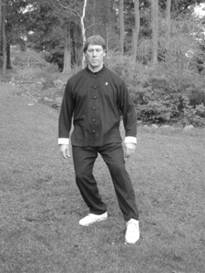
Horse Riding Stance
 The Horse Stance is the same as the Wu Chi stance except the body is lowered until the knees just cover the toes. This stance has more of a ready to move feeling to it. It also helps to build up the strength of the legs, improve concentration, and develop root, which is one of the fundamental elements for successful Tai Chi practice. Be sure to keep the back straight, as there is a tendency to lean slightly backward in this stance.
Moving Stance Basics
The feet and legs are the foundation of Tai Chi. The Classics says that if there is a problem with the form look to the legs. The feet and leg angles are also one of the areas of the most controversy. I continue to use the angles that Master Choy used after I had investigated the other options. These work for me, yet some people find other angles are more comfortable for them for various reasons. Don’t be afraid to experiment with other angles and use the ones that work for you. No one can feel your body but you.
The basic stances are bow/sit, ding bow on heel and toe, and horse riding stance. The basic steps are forward, backward or side ways.
As a general rule the rear foot should be at between 45-80 degree angles to the direction you are headed. The front foot always points in the direction you are going to end up. Of course, if you think of Tai Chi as a martial art then you should be able to react from any direction with little loss of power and flexibility. If health is your major concern then the body will dictate the proper foot positions. But you have to really know yourself to make the best foot positions. The reason being that the body might not be properly aligned now— your knees might not line up with your toes or other problems might affect your ability to move. Then when you make the correct movement it might not feel right because you aren’t used to it. Most of the time we have to give the body time to adjust to something new.
Another important point is to always have the knee line up with the toe and go in the direction the toe is headed. Many people have knees that don’t line up. Most knees tend to face inward in relation to the toe. This makes for many potential problems with the knee, hip and ankle. In the beginning you should make a concerted effort to make sure the knee stays in line with the toe and does not extend over the toe. Extending over the toe puts a lot of stress on the knee, shin, and ankle with a loss of root and stability.
On the bottom of the foot just below the ball in the center is a place called the Bubbling Well or Yung Chuan point. This point corresponds to the kidneys and is related to our utilization of energy. This point is the opening in the body for the Yin energy to enter. It is therefore important for this point to be pressed down on the floor as much as possible. In doing so you will feel more energized as well stable. It is also very important that the feet always be shoulder width apart. The body’s stability depends on this.
One more important thing to conceder — the stepping foot acts as a brake to stop your forward or sideways momentum. Therefore, make sure to step wide enough in the direction the movement is headed to establish a root and be ready to brake.
The more you practice the foot movements by themselves the quicker you will feel comfortable and gain more benefit and enjoyment from the form. You can overcome chronic physical limitations through the proper practice of Tai Chi. As a general rule most people tend to get a bit sloppy with their foot placement after a short while because the upper body and especially the hand movements are so intriguing. Don’t let down on your awareness of and concentration on the feet and legs. It is your root and foundation upon which all else is placed.
It is of utmost importance to get the foot movements correct. If you do not, your forms will never be correct and you will not be able to relax and move energy. Please practice these stances until they become natural. Also remember that these foot movements are natural movements done slowly. They are practical and purposeful. Pay close attention.
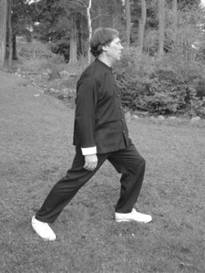
Bow And Sit Stance
 1) Start in Horse Riding Stance. Be sure the knees just cover the toes and go in the same direction as the toes. Keep the back straight.
2) Shift the weight onto the left foot. The right leg should be straight. Do not lean to the left. You should be able to bob up and down on the left foot.
 1) Turn the waist to the right and pivot out the right foot (on the heel) until the toe faces half way between north and east (straight and to the right). The torso faces the same direction. Be careful not to let the left knee collapse inward.
2) Shift the weight onto the right foot until the knee just covers the toe, and roll up onto the left toe. Do not lean. The torso continues facing the same direction as the right toe.
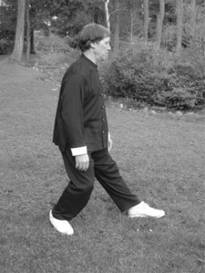
 1) Step straight forward with the left foot, just touching the heel. The toe faces straight (north). Do not put any weight onto the foot. The torso remains facing the right toe. Be careful not to narrow the width between the insides of the two feet when you step forward.
2) Shift the weight onto the left foot and as you do, turn the torso to face the left toe direction. The left knee should just cover the toe. Keep the back straight. Do not let the knees collapse inward.
You are now in left foot Bow Stance.
 Bow And Sit Practice
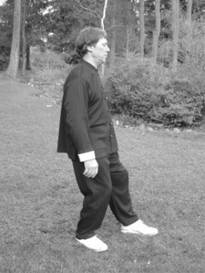
1) Left foot Bow Stance. The back is straight. The left knee just covers the toe. The right leg is almost straight but has some flex still in it. The right foot is at a 45-degree angle to the front foot. The shoulders and arms are relaxed at the sides.
2) Right foot Sit Stance.
Shift the weight straight back onto the right foot. Do not change the level of the body. The front leg pushes the torso back. The left leg is now straight without being locked. You are sitting on the right leg. Do not let the right knee collapse inward. Do not lean backward.
Practice
Shift the weight forward and backward smoothly and slowly about ten times. Then return to Horse Stance. Next, do the other side about ten times.
Bow and Sit Stance with Turning
This is basically the same practice as the straight Bow and Sit, but as you shift the weight from one foot to the other, you turn the trunk so that the nose will point from one knee to the other. You want to make sure that the legs do the same action as straight Bow and Sit, being careful not to pull the knee out of alignment when you shift and turn coming back into Sit Stance. You also want to make sure you are coordinating the turning and shifting so that you turn as you shift, not turn then shift or shift then turn. You practice this about 10 times each leg.
Ding Bow Stances
 The Ding Bow Stances on Heel and Toe are also called “empty stances” since no weight is placed on the forward heel or toe. These are very useful and have very specific reasons for their use.
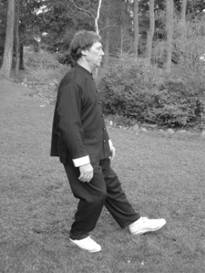
Ding Bow on Toe is a ready stance or a stance used in transition between parts of movements or entire movements. The forward toe is ready to kick, block, or step in any direction. It is the most basic stance used in all martial arts. Also, since it is empty, if it were to be kicked, it would not cause much trouble.
Ding Bow on Heel is actually a foot kick or stomp. It is difficult to move from this stance, as the forward leg is straight.
With either of these stances, be sure not to lean backward when stepping. It is easy to do. Be sure to sink your weight fully onto the solid foot and keep it there.
Practice
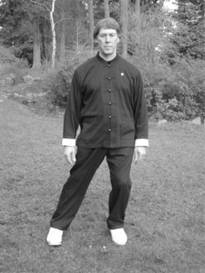
Start with your heels together and the toes turned out to 45-degree angles. Sit down until the knees just cover the toes. Be sure to keep the knees moving in the direction of the toes.
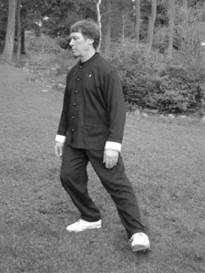
 Ding Bow on Toe
Step out he left foot and touch down the toe. The toe is in line with your shoulder, not your hip. The leg is bent slightly. It is hard to see in these pictures, but the left heel is slightly off the ground. You do not need to lift the heel too far off the ground as that can cause tension. Keep the back straight. Do not lean. Do not put any weight onto the left toe.
Bring the left foot back to its original position without moving the torso in any way. Then step out with the other foot. Do not lean when stepping. It is easy to do. Repeat ten times.

 Ding Bow Heel
From the starting position, step out and touch down the left heel. The toe faces straight ahead. Do not put any weight on the heel. The foot is in line with your shoulder, not the hip. The leg straightens, but is relaxed. The toe is slightly raised, but not too much. Be sure to have the toe face straight ahead. Do not lean when stepping out or back in. Keep the weight down the entire time.
This step is a bit like stepping on a clutch of a car. You have the feeling of pressing down with the foot.
First step with one foot then the other. Do ten repetitions.
Conclusion of Lesson 2.
This lesson focused on the Wu Chi Stance, the basic stance of stillness and standing meditation, and the moving stances of Bow and Sit. I cannot stress how important these stances are to practice before proceeding.
All movements in Tai Chi use these basic stances. At first, most people experience knee soreness when practicing these stances. Make sure you are doing them correctly. Make sure the knees are always pointing in the direction that the toes are headed. Do not extend the knee past the toe. I am including a few words about injuries and warning signs of possible problems. Please read this over and become familiar with what it contains. All this may appear overly cautious, but since I can’t be with you, you must take good care of yourself and listen carefully to all the signals the body sends.
<<Back to index